
How to Get Started Firebase UI Auth Provider Swift 4 iOS


I am starting a tutorial how to install a firebase Authentication in iOS Swift application and how to use Firebase UI Auth. You can use Firebase Authentication to allow to users different type login your application or sign In / sign Up  with including email id or password, with facebook login, twitter, Gmail, pinterest or more social account authentication. This blog post help you started, how to start firebase UI auth.

Firebase UI Auth

  • Click add project -> Type project name and if you mind customize project id and select your country code then accept term or condition create project. Next
  • Go to dashboard overview and select your app platform.
dashboard firebase

  • Now if you add ‘Add Firebase to your iOS app’, Then Copy your bundle ID past after type your nick name did you like, This is the bundle identifier of your Xcode project. Like com.abc if you optimize app store app the your required App store Id otherwise optional. After click add app
Firebase UI Auth iOS Developer Live

  • Getting GoogleService-Info.plist file. Download file and upload your Swift project drag /drop Xcode

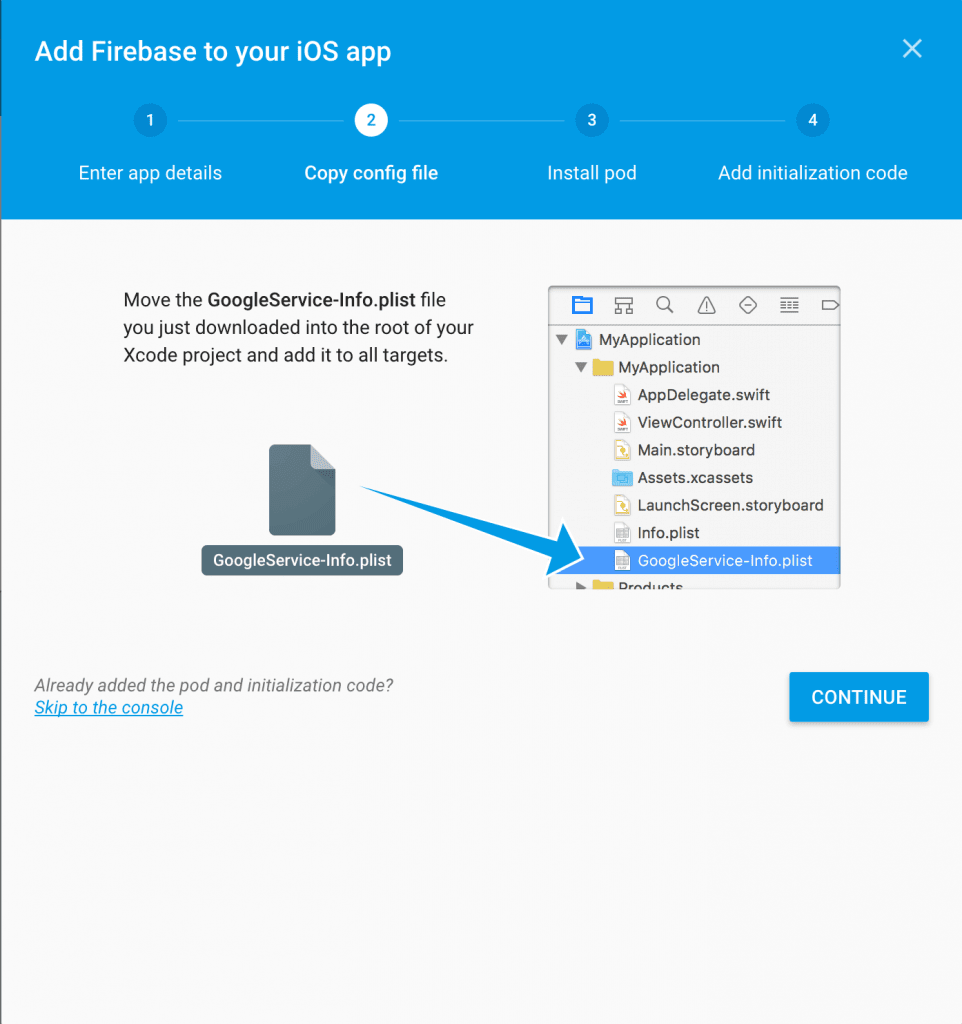
  • Continue Next to proceed to the next step.
  • Open terminal Command go to your project folder path.
  • After type pod init then create Podfile in your project
  • Open Podfile and edit in paste

                                pod 'Firebase/Core'
                                pod 'Firebase/Auth' or save podfile


  •   or after terminal install pod file

                                pod install

Implementing Firebase Using Swift Project In the project navigator, go to AppDelegate.swift.
Import Firebase

And  configure didFinishLaunchingWithOptions method

func application(_ application: UIApplication, didFinishLaunchingWithOptions launchOptions: [UIApplicationLaunchOptionsKey: Any]?) -> Bool {
   
    FIRApp.configure()
    return true
}

Comments

Popular posts from this blog

Add a Scene Delegate to your existing project with Storyboard in Swift

To add a scene delegate, first, create a new Swift file that you’ll call "SceneDelegate" containing a subclass of UIResponder, just like the AppDelegate, and that conforms to UIWindowSceneDelegate.  As your app might supports other versions than iOS 13, make this class only available for iOS 13. This is what you should have : If you are working a project that is storyboard based, please set storyboard  initial view controller SceneDelegate.swift import UIKit @available ( iOS 13.0 , *) class SceneDelegate : UIResponder , UIWindowSceneDelegate {     var window : UIWindow ?     func scene ( _ scene: UIScene , willConnectTo session: UISceneSession , options connectionOptions: UIScene . ConnectionOptions ) {                  let storyboard = UIStoryboard (name: "Main" , bundle: nil )         let initialViewController = storyboard. instantiateViewController (withIdentifier: "ViewController" )         let mainNavigationController = UINavigationControlle

How Create Animated Circle Progress Bar iOS 11 Swift 4

  Animated Circle Progress Bar iOS 11 Swift 4 With MBCircularProgressBa r - https://github.com/MatiBot/MBCircularProgressBar A circular, animatable & highly customizable progress bar from the Interface Builder Swift, Using pod fite MBCircularProgressBar Installation Cocoapods terminal. pod "MBCircularProgressBar" That - A Simple Steps to installed pod file -        Open terminal        Command on terminal go to project folder Cd path        set your project path on terminal.        command : pod init        open pod file - open -e podfile        added in pod file with in : pod "MBCircularProgressBar"        Command : Pod install        Close project of Xcode        open your Project from terminals        Command : open PodDemos.xcworkspace After opern StoryBoard and Now drag a UIView over the viewController in storyboard Or set UIView Constraint width, height or verticle or horzentail space and set a class MBCircul

How to Use Multiple Sections in UITableView iOS Swift !

Multiple sections in UITableView iOS Swift. UITableView is very important part of iOS ecosystem. So we split tableviews in sections. Then its easier to find right information.  1. First let’s create a project as usual. Create a new single view application X code project. Set project name to UIViewController.  2. Go to main storyboard & select view controller & use UITableView 3. Select tableview & make it initial view controller  4 Create a custom Sections Class like Name => TableSections, create register cell static return “ getCellNibs ” method. Then create  4 section enum “TableItems” then after append all sections to an array model. import UIKit struct CellNib {      static func getCellNibs () -> [ String ] {          return [ "Cell1" , "Cell2" , "Cell3" , "Cell4" ]     } } enum TableItems : Int {      case TableSections1      case TableSections2      case TableSections3      case TableSections4 } class TableSec